Volume 10 - Year 2024 - Pages 08-16
DOI: 10.11159.ijmmme.2024.002
Influence of Flux Agent Composition in A-TIG Welding Of Cu-ETP Sheets
Matija Bušić1, Sanja Šolić1, Vlado Tropša1, and Damjan Klobčar2
1University North, Department of Mechanical Engineering
Jurja Križanića 31b, Varaždin, Croatia, 42000
mbusic@unin.hr (M.B.); ssolic@unin.hr (S.Š.); vtropsa@unin.hr (V.T.)
2University of Ljubljana, Faculty of Mechanical Engineering
Aškerčeva 6, Ljubljana, Slovenia, 1000
damjan.klobcar@fs.uni-lj.si
Abstract - Due to its high coefficient of thermal expansion and high thermal conductivity, TIG welding of copper and copper alloys is considered difficult and demanding. Activated TIG welding (A-TIG) has been widely researched as a welding method for obtaining deeper penetration on various metals. However, A-TIG welding of copper remains unexplored without known influence of flux substances, applied parameters and achieved mechanical properties in produced welds. Three substances were examined as single component fluxes in this work: Calcium oxide (CaO), Silicon dioxide (SiO2) and Sodium carbonate (Na2CO3). Produced welds were characterized by visual inspection and macrostructural analysis, also bend testing and tensile strength testing were performed. Microstructure of the weld with optimal mechanical properties was analyzed by means of Field Emission Gun-Scanning Electron Microscope (FEG-SEM) and also the chemical characterization of the weld was made by means of Energy Dispersive Spectroscopy (EDS). The results showed that the most effective flux used was Silicon dioxide. A-TIG welding with SiO2 flux enabled good results in visual inspection, macrostructure analysis, band test and tensile strength test. However, oxide inclusions have been found in weld metal in significant percentage which could indicate the possible degradation of electrical conductivity of the Cu-ETP sheets.
Keywords: A-TIG welding, Cu-ETP, activating flux, silicon dioxide.
© Copyright 2024 Authors This is an Open Access article published under the Creative Commons Attribution License terms. Unrestricted use, distribution, and reproduction in any medium are permitted, provided the original work is properly cited.
Date Received: 2024-01-10
Date Revised: 2024-09-26
Date Accepted: 2024-10-03
Date Published: 2024-12-05
1. Introduction
Copper is reddish, soft and ductile metal, one of the few metals that can occur in nature in a directly usable metallic form. It is widely applied in many industrial applications playing a key role in the generation, delivery and use of electricity. From computers and electric vehicles, high voltage transmission wire and microcircuits to gigawatt generators and machine tools, copper is vital to every aspect of electricity generation, transmission and use. Copper and copper alloys have high electrical and thermal conductivities, good combinations of strength and ductility, processability using different production technologies and excellent corrosion resistance [1]-[4]. The electrical conductivity depends on chemical composition, the level of cold deformation and the grain size. The alloys designated as coppers contain at least 99.3 % of copper. Impurities as tin, phosphorus, arsenic, selenium and tellurium reduce electrical conductivity. Cu-ETP copper is an electrolytically refined, oxygen-containing copper with 99,9 % of Cu. If copper alloy contains oxygen it can cause embitterment in the heat affected zone and weld metal porosity.
Welding of copper alloys can be performed with Manual Metal Arc welding (MMA), Tungsten Inert Gas welding (TIG), Metal Inert Gas welding (MIG) and Plasma Arc Welding (PAW) [5], [6]. Advanced welding processes as Laser Beam Welding, hybrid Laser – MIG welding and Friction Stir Welding (FSW) have been researched and successfully applied in industry lately [7]-[10]. For welding copper or copper alloys the suitable type of current and shielding gas must be selected to provide maximum welding heat input that can supplements the fast heat dissipation through the material and cooling of the weld zone. Preheating is recommended for welding thicker sections of copper alloys. Recommended temperature in degrees Celsius can be calculated by multiplying the thickness of sheets (mm) by 100 considering upper limit may not exceed 600 °C.
As mentioned previously, TIG welding is widely applied technology for joining copper or copper alloys in manual and automated welding. Material thickness greater than 3 mm is necessary to weld in multiple passes and this greatly reduces productivity. Helium or a mixture of helium and argon is recommended as shielding gas for automated welding of thin sections and for manual welding of thicker sections [5]. Activated TIG welding (A-TIG) is a welding technology developed for increasing the penetration depth of the electric arc using standard equipment for TIG welding. It is based on application of a thin coating of activating flux material onto the workpiece surface prior to welding. Activating flux usually consists of single or mixture of oxides (Al2O3, CaO, Cu2O, Cr2O3, NiO, SiO2, MnO2, V2O5, ZnO, KCr2O7, TiO, TiO2, Ti2O3, Fe2O3, aluminium, selenium or sulphur) and/or halides (CaF2, MgF2, MgCl2, Na2WO4, AlF3 or CdCl) [11]-[19].
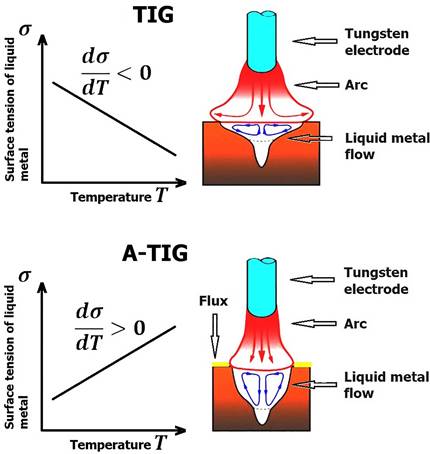
There are many different theories defining how activating flux effects the TIG process. For A-TIG welding of steel, Makara et al. used fluxes which give off vapours of fluorides, chlorides, oxygen compounds and other elements [16]. It was concluded that the ability of the flux to wet the surface of the weld pool had an effect on the surface tension which lead to deeper penetration. The Heiple-Roper theory [12] confirms that the difference in weld penetration depth is the consequence of activation flux agents in the liquid metal. The ability of flux is to reverse the surface tension gradient from negative to positive which reverses the Marangoni effect (Figure 1.). When liquid metal has negative surface tension gradient the central warming part is pulled towards the colder regions which has higher surface tension, and this makes shallower welds. If liquid metal has positive surface tension gradient it flows from the colder outer zone to the weld center, where the heat is transferred to the bottom. With this effect deeper welds can be produced with exactly the same welding parameters when comparing with standard TIG welding.
Simonik et al. proposed a theory of effectiveness of a flux content in constricting electric arc and linked it to a higher temperature of molecule formation and ionisation potential [13]. The conclusion was that the halogen entering the arc will be discharged either as neutral atom, as molecules, and as positive or negative ions. Along the axis of arc discharge the most probable state is a neutral atomic state with an extremely small quantity of positively charged ions. The ionization potential is the potential difference that is just sufficient to ionize a gas molecule or to remove an electron completely from the atom. The energy equivalent to ionization potential is called ionization energy. Due to the high value of ionization energy, there is hardly any ionization of the halogen atoms and all the processes are determined by elements of lower ionisation potential [13].
A-TIG welding has been investigated and confirmed successful in getting deeper welds in various metals including carbon steels [15], [17], stainless steels [11], [16], Incoloy [20] and magnesium alloys [14]. Only a research from Rana et al [21] reports about A-TIG welding of copper alloys. They have investigated the influence of single component fluxes on the depth to width ratio during welding of oxygen free copper with A-TIG. The fluxes which outperformed with all techniques were MoO3 and MgO. The conclusion in this work was that the flux agents constrict the electric arc reversing Marangoni effect. It is important to point out that ionization potential of Mo is 6.8 eV which is slightly below ionization potential of Cu (7.5 eV) and much below the Ar (15.2 eV) and He (23.7 eV). However, it is found that influence of the fluxes containing other agents could be investigated and the mechanical properties of produced weld should be measured.
The principal idea in this experiment was to use fluxes with elements that have ionization potential near to that of Cu and far below the ionization potential of used shielding gas. Substances used as single component fluxes in this work: Calcium oxide (CaO), Silicon dioxide (SiO2) and Sodium carbonate (Na2CO3) have ionization potentials 5.8, 7.8 and 4.9 eV respectively.
2. Materials and methods
The specimens for this research were prepared from Cu-ETP sheets with dimensions 190 × 75 × 3 mm and containing 99.9 % Cu. According to technical specification, copper sheets used in this work have tensile strength Rm = 248.9 MPa. However, Cu-ETP sheets usually soften when exposed to raised temperature for the certain time resulting in a significant loss of strength in the heat affected zones. This softening occurs at temperatures above 150 °C which is normally exceeded in welding processes. Hardness can decrease up to 50 % [22].
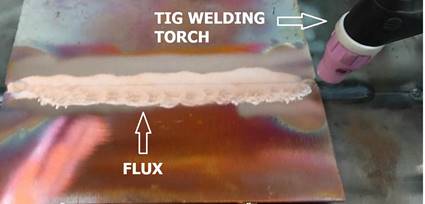
Each used flux was prepared with 30 g of single component powder (CaO, SiO2 and Na2CO3) mixed in 40 ml of ethanol to provide coating attachment on the surface of sheets in width of 15 mm. Figure 2 presents appearance of SiO2 flux on Cu-ETP surface prior to welding.
Welding was performed in butt joint configuration from one side without backing, using VARTIG 2005 AC/DC welding machine with automatic guidance system. Used shielding gas was helium/argon mixture with components share 50:50 with a gas flow 20 l/min. Distance from electrode to sheet dis was 3 mm. Welding parameters for all samples are presented in table 1. Variable parameters in welding process were welding speed v, cm/min and current I, A. These parameters along with voltage U, V combine welding heat input Q, kJ/cm as the main parameter.
After the welding the samples were visually inspected. According to penetration on the root side, on the entire length of the weld, it was decided that the flux composed of SiO2 has provided the best results. As a consequence, this flux was applied more times with different heat inputs for obtaining more experimental conditions. After welding test specimens were sectioned for bend tests, tensile strength testing, microstructure analysis and the microchemical characterization with the EDS. The specimens in dimensions 20 × 10 × 3 mm were prepared for microstructure analysis using the standard metallography procedure for welded specimens and analysed using stereomicroscope equipped with CANON EOS 200d digital camera. Dimensions of the weld were measured using ImageJ image processing software.
Table 1. Welding parameters.
|
Weld name |
Flux |
I, A |
U, V |
V, cm/min |
Q, kJ/cm |
|
W1 |
- |
165 |
16.6 |
20 |
4.93 |
|
W2 |
CaO |
165 |
16.6 |
20 |
4.93 |
|
W3 |
SiO2 |
135 |
15.4 |
20 |
3.74 |
|
W4 |
SiO2 |
145 |
15.8 |
22 |
3.75 |
|
W5 |
SiO2 |
145 |
15.8 |
24 |
3.43 |
|
W6 |
SiO2 |
145 |
15.8 |
26 |
3.17 |
|
W7 |
SiO2 |
150 |
15.9 |
20 |
4.29 |
|
W8 |
Na2CO3 |
155 |
16.2 |
22 |
4.11 |
Bend test was performed according to the standard ISO 5173:2009 [23] to confirm absence of imperfections on or near the surface of the welded joint. Four specimens were prepared from each produced weld, except specimen W8 which was immediately eliminated because of complete absence of welding. Two specimens were prepared for transverse face bend test and the other two for transverse root bend test. Testing samples were in dimensions 150 × 15 × 3 mm. The bend test setup was prepared as follows: the former was 6 mm in diameter, the rollers were 55 mm in diameter and the distance between rollers was 70 mm.
Tensile strength testing was performed on specimens extracted from the welds W4, W5, W6 and W7. These welds have acceptable results of visual inspection, macrostructure analysis and bend testing. From each produced weld two specimens were machined and labelled: for the weld W5 specimens are W5.1 and W5.2. Original cross-sectional area of the parallel part was SO = 30 mm2 and the parallel length was LC = 50 mm. The uniaxial tensile testing was conducted with constant stress control according to ISO 6892-1 [24] and with constant speed of applied load 12 MPa/s.
Microstructural analysis was performed on specimen sectioned from weld W5 by means of Thermo Scientific Quattro S FEG SEM. Secondary electrons were used for imaging, while the chemical quantitative microanalysis was done by EDS using Oxford Instruments Ultim Max 65 Energy-dispersive Detector with Aztec software. The analysis included observation of the specimen morphology to detect possible presence of microcracks and flux agent inclusions in weld metal.
3. Results
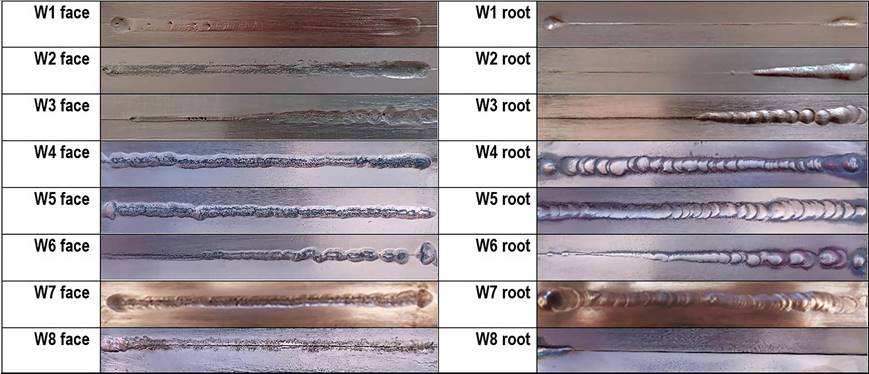
Figure 3 presents visual appearance of produced welds. Lack of penetration can clearly be seen on the root side of welds W1, W2 and W8 testing specimen and after first half of weld W3 from the welding starting point. Various weld with is also observed on face side of specimens W2 and W3. Narrow weld width and incomplete penetration can also be observed on weld W6 after good start and proper weld geometry. As visual appearance of specimen W8 on the face and root side has confirmed complete absence of welding this flux and testing specimen was eliminated from any further examination.
Figure 4 shows cross sections of produced welds with measured weld width on face and root side.
As specimens where sectioned 20 mm from the welding starting point specimens sectioned from welds W2 and W3 have full penetration although it reduces after. There were no inclusions or porosity observed in all produced welds. On the specimen sectioned from weld W1 depth of penetration and weld width were measured only on the face side.
Figures 5 and 6 present specimens after transverse bend test of butt welds. On each figure first two specimens from the left are transverse face bend test specimens and following specimens on the right are transverse root bend test specimens of the same weld.
These specimens have been completely bent around the former. According to standard ISO 5173:2009 “Destructive tests on welds in metallic materials – Bend test” samples after bending for 180◦ should not have cracks on the face and root sides. The visual inspection of the bent specimens showed that specimens presented in Figure 5 have failed and specimens in Figure 6 have passed the bend test.
Tensile strength testing was performed only on specimens extracted from the welds W4 - W7 that have previously passed visual inspection and bend testing. Tensile strength testing results are presented in Table 2.
Table 2: Tensile strength testing results
|
Weld desig. |
Fmax, kN |
Rmax, Mpa |
|
|
W4 .1 |
5.31 |
180.78 |
174.53 |
|
W4 .2 |
4.95 |
168.27 |
|
|
W5.1 |
5.12 |
174.20 |
174.19 |
|
W5.2 |
5.15 |
175.22 |
|
|
W6.1 |
4.99 |
169.82 |
190.73 |
|
W6.2 |
6.22 |
211.64 |
|
|
W7.1 |
5.94 |
188.7 |
183.3 |
|
W7.2 |
5.04 |
177.99 |
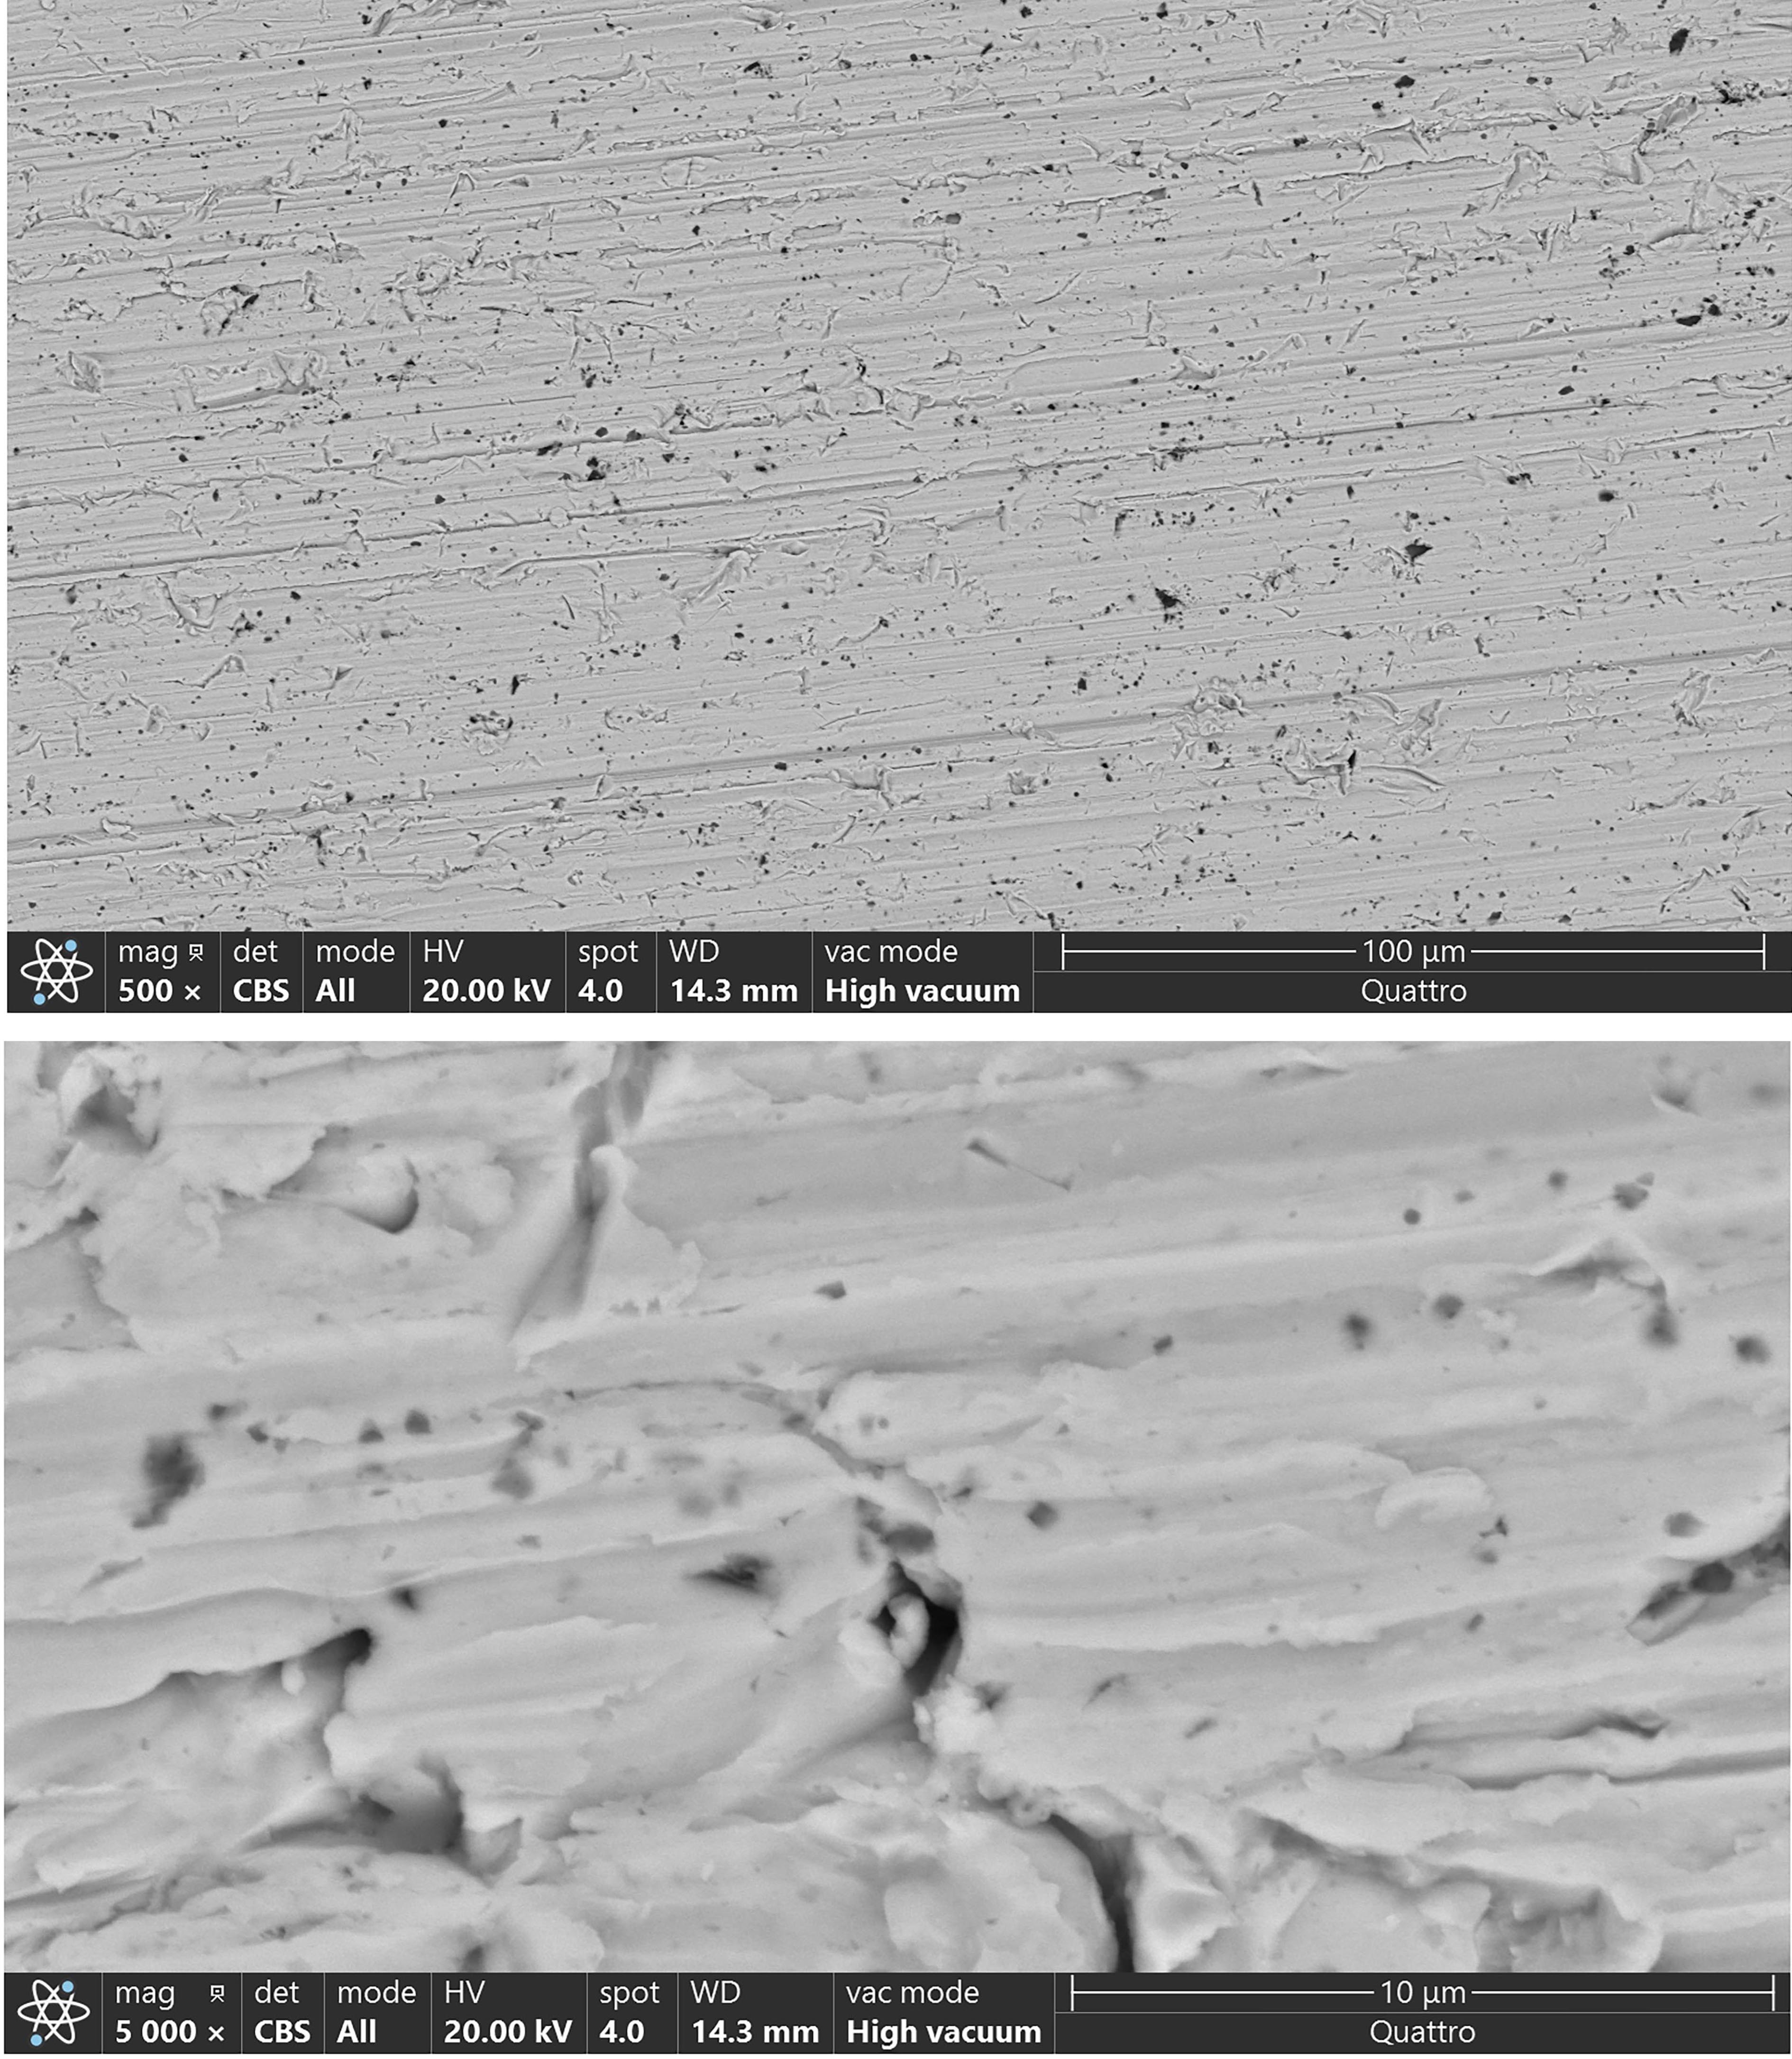
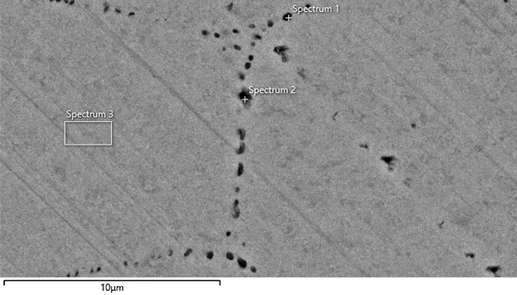
To identify the reasons for the lowest tensile strength, macrostructural specimen from weld W5 was chosen for further microstructural analysis and the microchemical characterization with the EDS. Figures 7 and 8 present SEM micrographs of weld metal from weld W5. Three locations of EDS chemical microanalysis have been marked in Figure 6. The corresponding results of this analysis are presented in Table 3.


Table 3 EDS chemical microanalysis results in weld W5.
|
elements |
Spectrum 1 |
Spectrum 2 |
Spectrum 3 |
|
O |
2.90 |
4.36 |
- |
|
Si |
- |
0.95 |
- |
|
Cu |
97.10 |
94.69 |
100.00 |
|
Total |
100.00 |
100.00 |
100.00 |
4. Discussion
Although weld W1 has been TIG welded without flux with highest heat input (4.93 kJ/cm) the weld penetration was not adequate. This can be observed in Figure 4 and confirmed with cracking of specimens in bend testing results (Figure 5). In weld W1 the heat input was not sufficient to supplements the fast heat dissipation through the material and cooling of the weld zone. The obtained penetration depth was not acceptable.
Welds welded using different fluxes for A-TIG welding show significantly different results. Visual inspection of the samples presented in Figure 3 clearly show that flux composed of Na2CO3 used for welding of testing specimen W8 is completely inappropriate and harmful for weld surface.
CaO flux on specimen W2 has increased the weld penetration at a start of the weld. Weld width in this specimen is of the face 6.9 mm and on the root side is 7.43 mm. However, heat input was insufficient to counteract high thermal conductivity and heat dissipation through the Cu-ETP plates. The prediction is that with higher heat input achieved with higher current or lower welding speed it will be possible to supplements the fast head dissipation through the material and cooling from the localized weld zone. This thoroughly depends on strong influence of parameters variations in TIG welding of copper as it is presented in literature from other authors [4]-[6].
Welds W3 – W7 have shown positive influence of flux containing SiO2 on the weld penetration and a melting profile accomplished with arc constriction. Welds W4, W5 and W7 have complete penetration in full length although they were welded with less heat input when compared to weld W1. When heat input is lower the width of weld is decreased. This was observed on specimens W5 and W6 in Figure 4.
The influence of flux mixing method and manual application of the flux coating on the surfaces is noticeable in weld tortuosity. Despite straight electrode guidance by automatic guidance system, accumulation of SiO2 particles in some places resulted with uneven melting process stability and irregular surface on the face and specially on the bottom sides of the welds W3-W7 as presented in Figure. 3. Uneven flux coating on the surface resulted with asymmetry of the A-TIG process.
It was observed that the samples processed with A-TIG demonstrated larger grains in the middle and long needle-shaped grains at the boundary of fusion zone. The same microstructure is observed in the work of Rana et al. [21]. Fusion zone of A-TIG experienced rapid heating which is followed by rapid cooling due to high thermal conductivity of the copper, thus instigating directional solidification towards heat affected zone which decelerates the grain growth and defines their orientation.
Bend testing was performed in order to assess ductility and confirm absence of imperfections on or near the surface of the welded joint. Welds W1, W2 and W3 have failed the bending test because samples have cracks or have been completely broken at the root or even on the face side. Welds W4 - W7 have passed bend testing which confirmed absence of kissing bonds, lack of fusion or brittle structures (Figure 6).
Tensile strength tests presented fairly uniform results. Welds W4, W5 and W7 are very similar in weld geometry and also have similar results in tensile strength testing. Weld W6 has been welded with highest welding speed, 26 cm/min, and that can be result of lowest strength decrease. As it has been mentioned before, strength can fall for 50 % in heat affected zone of cold worked copper sheets. In this experiment welds with proper weld geometry have the strength around 174 MPa that is 70 % of strength of the base material.
SEM micrographs of weld metal in Figures 7 and 8 have confirmed absence of micro porosities larger than 10 μm, thus confirming a homogeneous structure. Larger porosities have also been excluded in macrostructure analysis (Figure 4). The structure is composed of alpha copper grains. Eutectic copper and copper oxide Cu2O can be seen on grain boundaries in Fig. 8. As the solidification of copper is rapid process, oxygen molecules could be entrapped between grains and form micro porosity. Copper dissolves small amounts of oxygen in solid solution (alpha). If the solubility of oxygen is exceeded, eutectic alpha copper and copper oxide Cu2O are formed, in the weld metal.
With EDS chemical microanalysis of specific marked locations (presented in Figure 8) 2.9 % and 4.36 % of oxide has been measured. The presence of oxide inclusions is also reported in previous work of Rana et al. [21]. In A-TIG welding process decomposition of the oxide-based flux during welding with high temperature of electric arc may be the reason of oxide presence in the weld metal. Oxides dissolved into the molten pool could escape out, through the surface, during the process of solidification or stay entrapped in the weld metal. These inclusions could reduce the tensile strength and act as crack nucleus especially in application of dynamic loading on the welded joint. Silicon inclusions have been detected in one location in weld metal of specimen W5 in quantity of 0.95 %. Silicon inclusions are measured in small percentage and should not have the strong influence on degradation of weld metal mechanical properties. The specimens in this work were prepared from Cu-ETP sheets in which a level of 0.02 %–0.04 % oxygen is maintained for oxidation of the remaining impurities to oxides which would otherwise dissolve in the copper forming solid solutions, thereby reducing conductivity. Impurities and oxide inclusions discovered by EDS chemical microanalysis in welded specimens in this work could also decrease electrical conductivity. This indicates that in future work electrical conductivity of A-TIG welded Cu-ETP sheets should be also investigated in detail.
5. Conclusion
Based on the results presented in this work, the following conclusions can be made:
- TIG welding of Cu-ETP sheets will require heat input above 4.93 kJ/mm if full penetration and proper weld bead is to be achieved.
- Na2CO3 is not appropriate as a flux component for A-TIG welding of CuETP sheets. It produces inappropriate weld surface and has no influence in increasing penetration depth.
- Flux composed of CaO has certain potential for usage for A-TIG welding of Cu-ETP sheets, thus more suitable parameters need to be adjusted. It is possible to slightly raise the heat input in order to produce weld with continuous weld width and full penetration.
- Flux composed of SiO2 has strong influence on weld bead geometry and penetration depth in A-TIG welding of Cu-ETP sheets. Using SiO2 as flux will have significant advantage, full penetration could be achieved with 30 % less heat input when compared with the standard TIG welding of Cu-ETP sheets.
- A-TIG welding of Cu-ETP sheets with SiO2 flux will produce weld with required plasticity and formability to pass the three-point bend test according to standard ISO 5173:2009.
- A-TIG welding of Cu-ETP sheets with SiO2 flux will produce weld with acceptable tensile strength that is 70 % of tensile strength of the base material. Penetration will be sufficient and weld metal will be free of pores in the microstructure. However, these welds will have oxide inclusions that could reduce dynamic strength and electrical conductivity.
Acknowledgements
This research was funded by: University North support for scientific research and artistic work in 2020 - UNIN-TEH-20-1-14 and University North support for scientific research and artistic work in 2024 – UNIN-TEH-24-1-19. This work was also supported by the Slovenian Research Agency, under grant number P2-0270.
References
[1] O. Cakır, H. Temel, M. Kiyak, "Chemical etching of Cu-ETP copper", Journal of Materials Processing Technology, vol. 162-163, pp. 275-279, 2005. View Article
[2] R. N. Caron, R. G. Barth, D. E. Tyler, "Metallography and Microstructures of Copper and Its Alloys - Metallography and Microstructures" in ASM Handbook, vol 9, pp. 775-788, 2004. View Article
[3] T. Watari, S. Northey, D. Giurco, S. Hata, R. Yokoi, K. Nansai, K. Nakajima, "Global copper cycles and greenhouse gas emissions in a 1.5 °C world", Resources, Conservation & Recycling, vol. 179, pp. 106-118, 2022. View Article
[4] Q. Jiang, P. Zhang, Z. Yu, H. Shi, D. Wu, H. Yan, X. Ye, Q. Lu, Y. Tian, "A Review on Additive Manufacturing of Pure Copper", Coatings, vol. 11, no. 6, pp. 760, 2021. View Article
[5] M. N. Rogers, "Welding of Copper Alloys" in Welding brazing and soldering" ed. D. L. Olson, T. A. Siewert, S. Liu, G. R. Edwards, ASM Handbook, vol. 6, pp. 1872 -1922, 1993. View Article
[6] D. Raghavendra, B. Vishvesh, M. Kush, J. Jaydeep, Y. Ashish, K. C. Arun, "Investigation on stability of weld morphology, microstructure of processed zones and weld quality assessment for hot wire gas tungsten arc welding of electrolytic tough pitch copper" Materials and Manufacturing Processes, vol. 37, no. 8, pp. 908-920, 2020. View Article
[7] S. T. Auwal, S. Ramesh, F. Yusof, S. M. Manladan, "A review on laser beam welding of copper alloys", The International Journal of Advanced Manufacturing Technology, vol. 99, pp. 475-490, 2018. View Article
[8] L. J. Zhang, Q. L. Bai, J. Ning, A. Wang, J. N. Yang, X. Q. Yin, J. X. Zhang, "A comparative study on the microstructure and properties of copper joint between MIG welding and laser-MIG hybrid welding" Materials and Design, vol. 110, pp. 35-50, 2016. View Article
[9] W. B. Lee, S. B. Jung, "The joint properties of copper by friction stir welding", Materials Letters, vol. 58, pp. 1041-1046, 2004. View Article
[10] T. Will, T. Jeron, C. Hoelbling, L. Müller, M. Schmidt, "In-process analysis of melt pool fluctuations with scanning optical coherence tomography for laser welding of copper for quality monitoring", Micromachines, vol. 13, pp. 1-11, 2022. View Article
[11] D. Klobčar, J. Tušek, M. Bizjak, S. Simončič, V. Lešer, "Active flux tungsten inert gas welding of austenitic stainless steel AISI 304", Journal Metalurgija, vol. 55, pp. 617-620, 2016.
[12] C. R. Heiple, J. R. Roper, "Mechanism for minor element effect on GTA fusion zone geometry" Welding Journal, vol. 6, no. 4, pp. 97-102, 1982.
[13] A. G. Simonik, V. I. Petviashvili, A. A. Ivanov, "The effect of contraction of the arc discharge upon the introduction of electronegative elements", Svaroch proizvod, vol. 23, no. 3, pp. 49-51, 1976.
[14] B. Qin, R. Qu, Y. Xie, S. Liu, "Numerical Simulation and Experimental Study on the TIG (A-TIG) Welding of Dissimilar Magnesium Alloys" Materials, vol 15, no. 14, 4922, 2022. View Article
[15] J. Niagaj, "Influence of Activated Fluxes on the Bead Shape of A-TIG Welds on Carbon and Low-Alloy Steels in Comparison with Stainless Steel AISI 304L" Metals, vol. 11 no. 4, 530, 2021. View Article
[16] A. M. Makara, B. N. Kushnirenko, V. N. Zamkov, "High-tensile martensitic steels welded by argon tungsten arc process using flux", Automatic Welding, vol. 7, pp. 78-79, 1968.
[17] R. H. Zhang, D. Fan, "Weldability of activating flux in A-TIG welding for mild steel", Transactions of the China welding institution, vol. 1, pp. 85-87, 2003.
[18] P. J. Modenesi, E. R. Apolinario, I. M. Pereira, "TIG welding with single-component fluxes", Journal of Materials Processing Technology, vol. 99, pp. 260-265, 2000. View Article
[19] S. Suman, P. Bashab Chandra, D. Santanu, "Productivity improvement in butt joining of thick stainless steel plates through the usage of activated TIG welding", SN Applied Sciences, vol. 3, a. n. 416, 2021. View Article
[20] S. A. Kumar, P. Sathiya, "Experimental investigation of the A-TIG welding process of Incoloy 800H", Materials and Manufacturing Processes. vol. 30, no. 9, pp. 1154-1159, 2015. View Article
[21] H. Rana, V. Badheka, P. Patel, V. Patel, W. Li, J. Andersson, "Augmentation of weld penetration by flux assisted TIG welding and its distinct variants for oxygen free copper" Journal of Materials Research and Technology, vol. 10, pp. 138-151, 2021. View Article
[22] Copper Alliance. European Copper Institute-Cu-ETP, (2023, November 20) [Online]. Available: View Article
[23] ISO 5173:2009 Destructive tests on welds in metallic materials - Bend tests
[24] ISO 6892-1:2019 Metallic materials - Tensile testing - Part 1: Method of test at room temperature

